For lack of a better title, ever had the problem with Virtualbox where you’re working happily in the guest OS, unplug your laptop, get underway, and see the end of your guest OS access. It’s always either Internet access or local access for your VM. Well, that’s no longer an issue.
Case exploration
In this example I use my own setup but it should be doable on any host/guest OS combination. My setup is a Macbook running OSX snow leopard with a guest OS running Ubuntu server. Before getting into the details; The trick is to hook up Ubuntu’s eth0 to one of your normal interfaces (physical or wifi) and link Ubuntu’s eth1 to a virtual network device in your host OS. In this setup you always have local (back-end) access to your virtual guest OS and whenever you have Internet access so does your guest OS.
The details
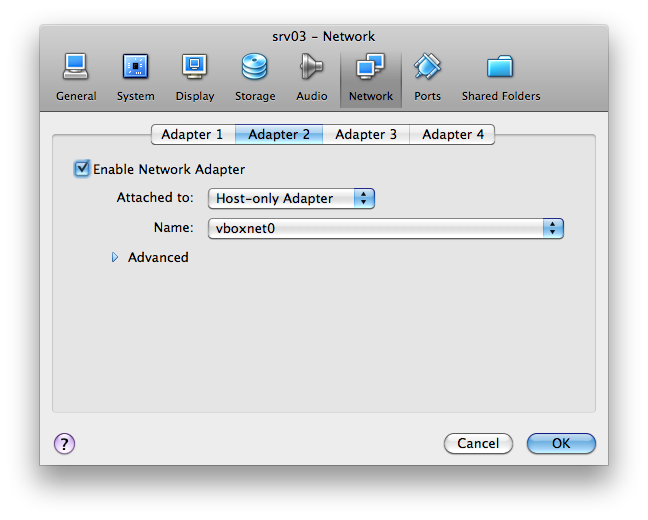
I’m assuming you’re already running Virtualbox on OS X and an Ubuntu installation as guest OS. First we need to create a virtual network interface to which we can ‘link’ our eth1. For this we need a driver that emulates a network device. Typically we need a tun/tap driver. Therefore download and install Tuntap for OS X. In the Virtualbox network configuration for the guest OS we need to configure (and enable) the second ethernet adapter and set it as ‘host only’.

NB: the name vboxnet0 will be changed to be tap0 but that will be handled in a minute.
To setup the virtual interface you need to download and run the following script: tap.sh. Running tap.sh (as root) will create a virtual network device that can be used for Ubuntu’s eth1 to hook into. Whilst having the tap0 device operational with IP address 10.10.10.1 the following commands will set the Virtualbox settings for Ubuntu to bind to it.
List your VM’s and pick the right one:
$ VBoxManage list vms
Enable the 2nd network interface of your VM
$ VBoxManage modifyvm [VM name] --intnet2 hostif
Set the interface to ‘host only’:
$ VBoxManage modifyvm [VM name] --hostonlyadapter2 tap0
Note: The last command(s) seem obsolete since the release of Virtualbox version 4.0.4 r70112 or later. In older versions the tap0 used to fallback to vboxnet0 after closing Virtualbox. But the network configuration is now persistent when set to device tap0. So, depending on the version you use your mileage may vary. Test it with restarting Virtualbox and see if your VM network config looks similar to this:
Running that last command once will suffice for the long run instead of between every Virtualbox or workstation startup (besides the tap.sh script that is).
That being said, you’re now ready to start the Ubuntu VM. You should probably access Ubuntu via the front-end nic the first time since the back-end nic in the guest OS isn’t configured yet. Having logged into Ubuntu you should setup your interfaces as follows. For eth0 you can either choose static or dhcp, whatever runs easiest on your network.
Setup Eth1 as static in network segment 10.10.10.0/24, from 10.10.10.2 upwards with 10.10.10.1 being your tap0 hosts OS interface (from the tap.sh script).
auto eth1
iface eth1 inet static
 address 10.10.10.13
 netmask 255.255.255.0
 broadcast 10.10.10.255
Either reboot your Ubuntu VM or restart the network with:
$ /etc/init.d/networking restart
You should now be able to login on Ubuntu with:
$ ssh you@10.10.10.3
Now unplug your physical network connection in your host OS (that’s Ubuntu’s eth0) and you can still login on your VM via the 10.10.10.0/24 network.
Gotcha’s
The only one I can think of is the need to manually add the default route to the outside world over etho. This happens when the host OS’s physical network has been disconnected. I assume it’s because Ubuntu’s eth0 has been down with which the route is dropped. You can easily resolve this with the following command:
$ ip route add default via [your gateway's IP]
If you have any questions or comments please feel free to drop me a line.
References
– The inspiration for this article: https://tinyurl.com/6z29w45
– OSX’s TunTap driver: https://tuntaposx.sourceforge.net/
– Tun/Tap info on wikipedia: https://en.wikipedia.org/wiki/TUN/TAP
– The tap.sh script: tap.sh

